Pythonを使って、複数枚撮影した画像からのノイズ除去を行います。以前非動体の被写体に対して、手持ちの9枚連写で撮った画像の合成でその効果を確認しましたが、今回は動体(人)を対象としてみます。手法としてはNon-Local Meansに着想を得ています。
世の中ではこの機能マルチショットノイズ除去と呼ばれているようです。一部デジカメやスマホでも搭載されている機能です。
静止物の撮影
静止物を被写体としたものはこちらの記事にて。これでも十分機能しています。

この手法、画像間の位置合わせを画像全体を使って行っています。静止物を対象としている場合には、これでも全体的にそれなりに位置があってくれます。微妙なずれは、前述の記事にあるようなバイラテラル的合成で回避できています。
動体の課題
やはり人を被写体にすると、動いちゃいます。まぁ当然ですよね。試しに子供に「動くな!」といってカメラを向けてシャッターを切ってみたところやはり微妙に動いています。顔もこわばってるし。もちろん撮影者側も動くので、カメラは動く、被写体も動くで非動体を対象とした前回の手法ではイマイチ、シャキッとしない画像ができてしまいました。もちろん前回の記事に載せたようなバイラテラル的合成をしないものだと、全然ダメ。
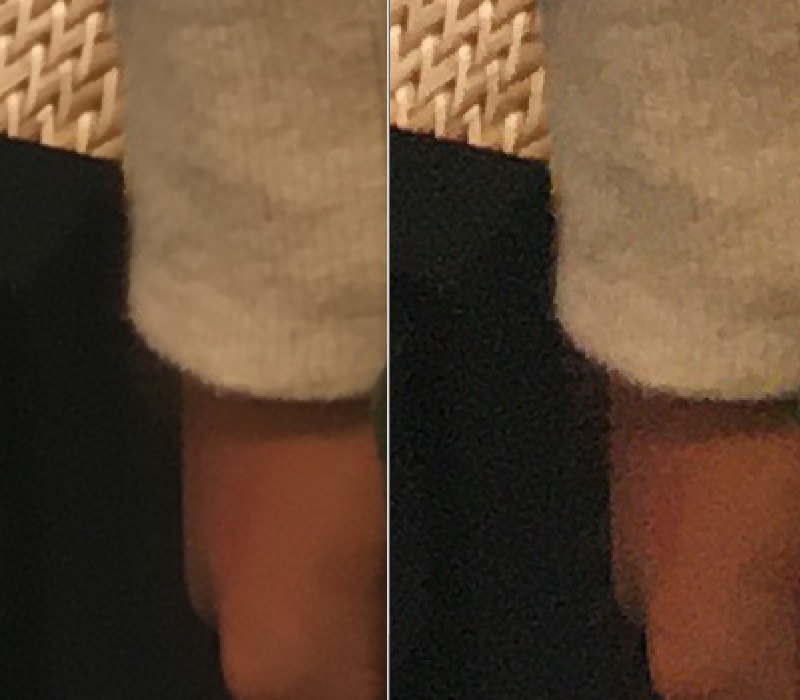
袖口から手にかけてを拡大したものです。右が1枚もの、左が8枚の画像をバイラテラル的に合成したものです。もちろんノイズは取れているのですが、シャープ感が失われています。ぶれているように見えてしまいます。
2人を同時に撮影したところ、さらにうまく行きません。もちろん2人とも違う動きをしてしまうので、画像間の位置合わせに画像全体を使ってしまうと、局所的にはずれが大きくなっていきます。
背景や周りの静止物はきれいにノイズが取れているだけに何とかしてみたいものです。
Non-local Means的なマッチング
画像のノイズ除去手法として、Non-local Means Filterというものが知られています。これは画像の中からちょっと遠いところも含めて、画像の類似性を探して、ノイズを除去する手法です。小さなウィンドウをちょいと遠くからずらして、相関が高いところの画像とそのウィンドウとのフィルタ合成をするものです。通常1枚の絵から行いますが、動画のような複数フレームモノに対しても使われるようです。
今回この手法を真似ます。ただ真面目にトレースすると処理時間がエライかかるので、隣接フレーム間の
・動きは小さい。
・画角はほとんど変化がない。
を仮定して、手を抜きます。この仮定で、あるベース画像と類似した隣接フレームの画像を取得し、ノイズ除去をします。行ってしまえばブロック単位に位置合わせをするだけですが。
部分的位置合わせ
とてもややこしいことをしました。自分でも忘れそうなので、丁寧に書いときます。最後にPythonのソースも載せますが、自分でも何をしたかったのかわからなくなりそうです。
処理の大雑把な流れとしては、
小領域毎にアフィン行列推定
さらに小さいブロック単位にアフィン行列補間
ブロック単位にアフィン変換
ブロック単位にパターンマッチング
の大きく4つの処理をして細かく位置合わせをしていきます。これでいわゆるNon-local Means的な着想を元に、マッチングを行い、画像を生成します。
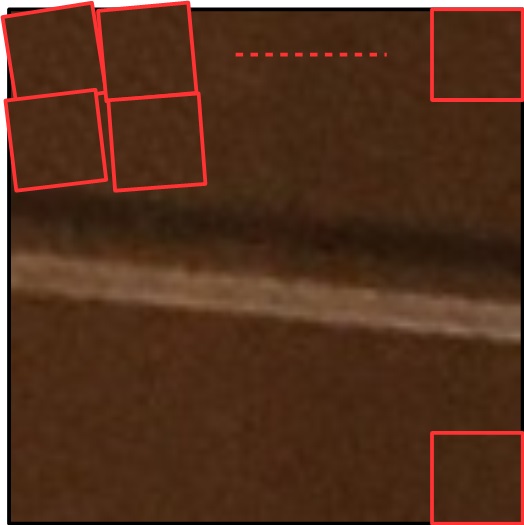
まず位置合わせには、前回同様にSIFT、厳密にはAKAZEと呼ばれる特徴量を使って、2枚の画像の位置を特定し、Affine変換で位置合わせされた画像を作ることにします。
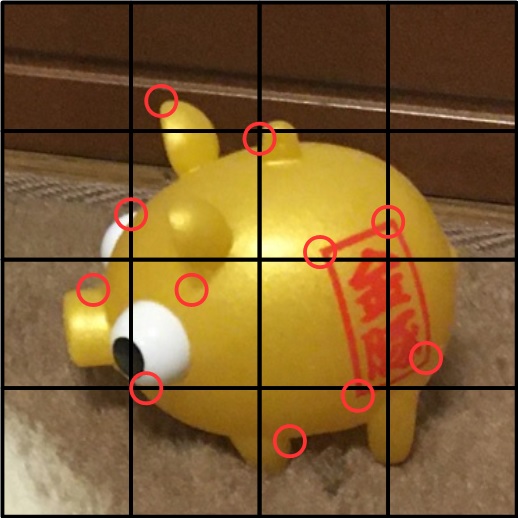
こんなイメージ。画像の中から特徴量を取り出し、それを2枚で突き合せます。ソースは
###############################
# 2枚の画像のマッチングポイントを探す
def get_matcher(img1, kp2, des2):

    kp1, des1 = get_key_point(img1)

    if len(kp1) == 0 or len(kp2) == 0:
        return None

    # Brute-Force Matcher生成
    bf = cv2.BFMatcher()
    matches = bf.knnMatch(des1, des2, k=2)

    # store all the good matches as per Lowe's ratio test.
    good = []
    for m, n in matches:
        if m.distance < 0.7 * n.distance:
            good.append(m)

    if len(good) == 0:
        return None

    target_position = []
    base_position = []
    # x,y座標の取得
    for g in good:
        target_position.append([kp1[g.queryIdx].pt[0], kp1[g.queryIdx].pt[1]])
        base_position.append([kp2[g.trainIdx].pt[0], kp2[g.trainIdx].pt[1]])

    apt1 = np.array(target_position)
    apt2 = np.array(base_position)

    return apt1, apt2
ちょっと長いですが、前回の記事で説明したとおりです。
この際、前回はベースの画像と合わせたい画像で、画像単位のマッチングを行っていましたが、合わせたい画像の方を16分割した小領域に分け、それぞれの小領域単位にマッチングを取ることにします。小領域の特徴量とベース画像の特徴量をマッチングし、その小領域ごとにアフィン行列を求め、16個のアフィン行列の列を作ります。

ソースは
###########################################
## 領域毎にマッチングポイントを切り出す。
def trim_point(start, end, pt1, pt2):
    tmp = np.where((start[0] < pt1) & (pt1 < end[0]))
    indx = tmp[0][np.where(tmp[1] == 0)]
    ptx1 = pt1[indx]
    ptx2 = pt2[indx]

    tmp = np.where((start[1] < ptx1) & (ptx1 < end[1]))
    indx = tmp[0][np.where(tmp[1] == 1)]
    apt1 = ptx1[indx]
    apt2 = ptx2[indx]

    return apt1, apt2

####################################
## 部分的な領域からアフィン行列を求める
def get_affine_mtx_partial(sx, sy, width, height, pt1, pt2):
    ex = sx + width
    ey = sy + height
    apt1, apt2 = trim_point([sx, sy], [ex, ey], pt1, pt2)
    if len(apt1) < 8:
        apt1 = pt1
        apt2 = pt2

    return cv2.estimateAffinePartial2D(apt1, apt2)[0]
開始座標とサイズから、ペアとなる座標対を作り、そこからアフィン行列を作っています。
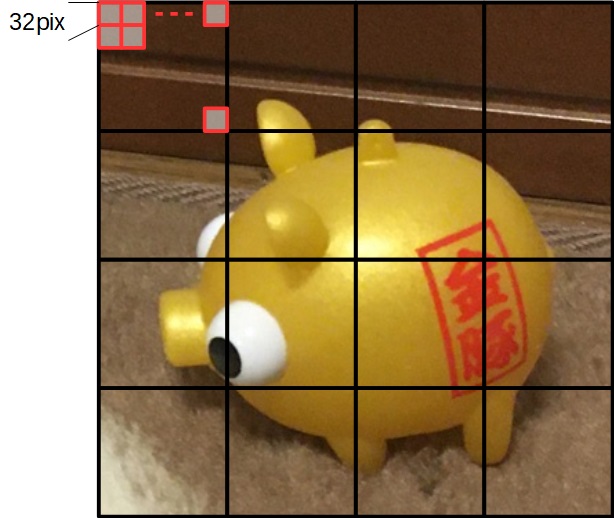
その後、画像をさらに細かく、今回は32×32画素単位(以降ブロックと呼ぶ)に分けます。そのブロック単位のアフィン行列を、AKAZEのマッチングで求めた16個のアフィン行列から補間演算で作ります。
ソースの箇所は、
    # 32x32単位で画像の位置合わせをしていく
    w = (width-ofst[0]) // 32
    h = (height-ofst[1]) // 32
    affinarray = np.array(affinarray).reshape(4, 4, 6)
    affinarray = cv2.resize(affinarray, dsize=(w, h), interpolation=cv2.INTER_NEAREST)
ここで、OpenCVのリサイズ関数で線形に補間させています。
ここまでの処理で、各ブロックのアフィン行列が求まりますので、その行列を使ってアフィン変換を行います。これでブロック単位の画像がモザイク状に位置合わせがされます。
微小な回転を伴っているイメージ。これに対して、さらにパターンマッチングを使って微調整をします。今回はブロックそのものをテンプレートに、上下左右32画素ずらしながら、最も相関が高い位置を探します。
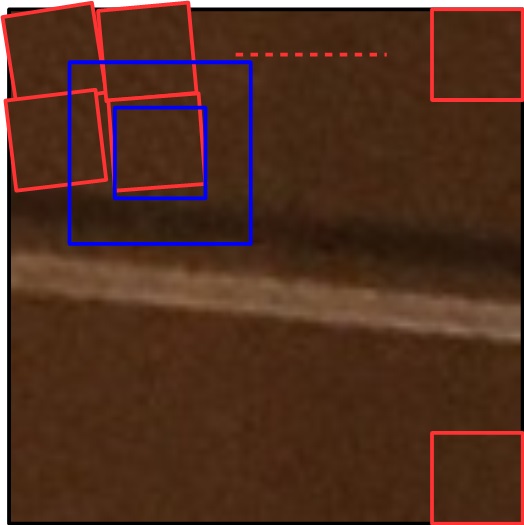
青い箇所が探索範囲で、その範囲をOpenCVの力を借りてパターンマッチングしています。この部分に当たるソースコードが、
####################################
## 部分マッチング(img1の一部をaffine変換したうえで、img2とパターンマッチングして微調整)
def get_affine_img_partial(sx, sy, width, height, img1, img2, tform):
    ex = sx + width
    ey = sy + height

    ofst = 32
    tform[0, 2] -= (sx - ofst)
    tform[1, 2] -= (sy - ofst)

    resz = cv2.warpAffine(img1, tform, (width + 2 * ofst, height + 2 * ofst))
    template = img2[sy:ey, sx:ex, :]

    res = cv2.matchTemplate(resz, template, cv2.TM_SQDIFF)
    min_val, _, min_loc, _ = cv2.minMaxLoc(res)

    if min_val > 1000000:
        return template
    else:
        return resz[min_loc[1]:min_loc[1] + height, min_loc[0]:min_loc[0] + width, :]
ここまでで、あるベース画像とブロック単位に細かく位置があった隣接フレームの画像が作成されます。アフィン変換の際に、パターンマッチング用に少し大きめに変換しています。また、ここで設定したパターンマッチングの閾値1000000は適当です。あまりに相関がない場合のエラー処理です。
バイラテラル的合成
このようにして作成された画像と、ベースの画像を前回記事にしたような、バイラテラル的合成を行います。詳細は前回の記事を参照してください。これによりぶれを最小限にした、2枚の合成画像が作成されます。
位相ずらし
ここまででおおよそ普通の画像はうまく行くのですが、画像によって32×32のブロック単位の境界が、合成後の画像にスジのように見えてしまうことがありました。これは面白くないので、合成するフレーム毎にブロックに切る位置を微妙にずらしていくことにしました。
具体的には、最初は(0,0)の座標をスタートにブロック分割し、次のフレームでは、(2,2)の座標をスタートにブロック分割する。というように、2画素ずつずらしてみました。とりあえずこれでブロック境界が見えるようなことはなくなりました。加えて、同じ画像でも、ブロック分割のスタート座標を半位相(16,16)ずらしたものとも位置合わせし、2回の合成をするようにしました。
結果
ここまですると、被写体が多少動いても、さらには2人の被写体でもそれなりにうまくノイズ除去ができました。
先ほどと同じように、右が1枚もの、左が8枚の画像を今回のNon-local的な合成をした複数枚ものです。ノイズ成分がなくなっているのはもちろん、ぶれもほぼないです。
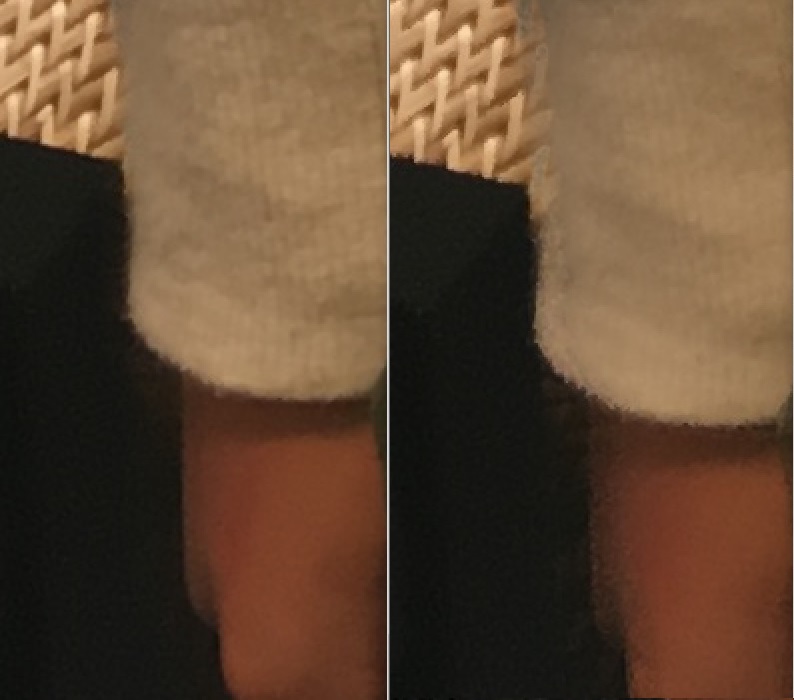
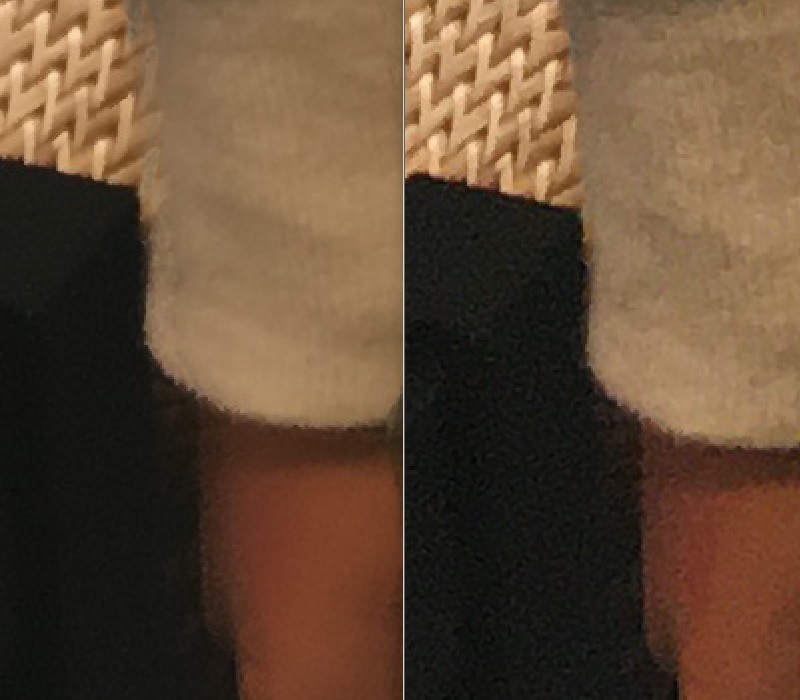
右にバイラテラル的な合成のみ、左にNon-local的な合成をした結果です。 ぶれがなくなっています。シャキッとしてます。心なしかノイズ除去の効果も強いようにすら思えます。
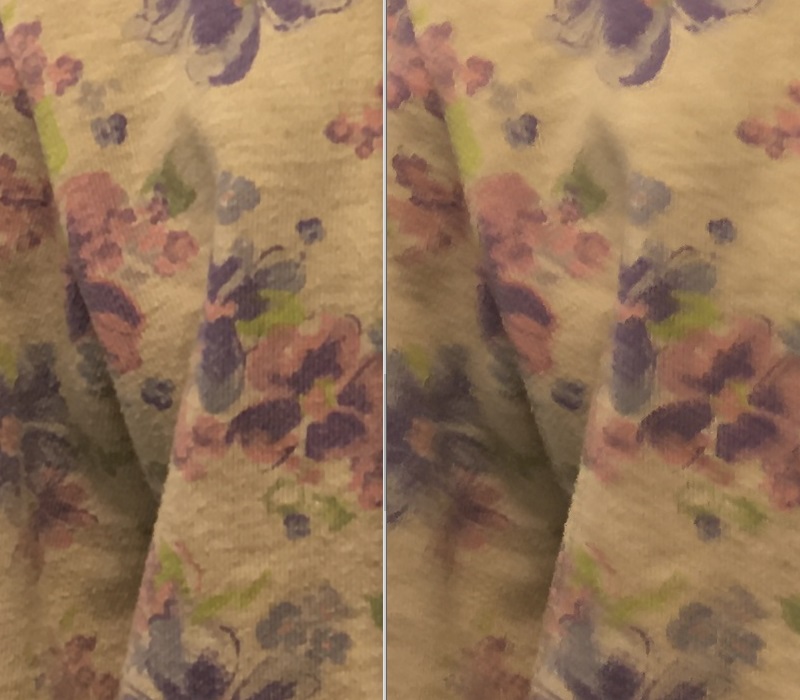
洋服の箇所を拡大しています。同様に、右にバイラテラル的な合成のみ、左にNon-local的な合成をした結果です。洋服のテクスチャを残しつつ、ノイズ除去ができています。
ただ処理時間はエラク伸びました。手を抜いて、ブロック単位の位置合わせにとどめましたがそれでもそれなりに待たされます。が高速化の工夫に関しては今回は対象外とします。まぁいいっしょ。
まとめ
複数枚連写画像を使って、ノイズ除去を目的とした画像合成をやってみました。Non-local Means的な合成をしてやることで、ちょっとした動きがのっかっているような被写体でも、それなりの結果が得られました。
位置合わせとパターンマッチングをしているだけなので、なんでそれがNon-local Meansなんじゃい。といわれるかもしれませんが、考え方としてね。バイラテラル的な合成とNon-local Means的な合成と対比したかったのもあったので。フレーム間で動きがある場合のノイズ除去としてはこの手段が適しているようです。
今回の写真はiPhone SEのものです。今回の件で、1枚物は暗いところではひどくノイジーであることと、複数枚取っておけば後処理で何とでもなるな。ということが分かりました。スマホで写真撮るときは後でどうとでもなるように、複数連写にしておこう。と思いました。
コード
解説してられないくらい長くなりました。もう少しリファクタできそうですが、それも面倒なのでべたっと載せます。読めない長さではないと思います。前回の記事同様簡単なUI付きです。コピペで動くはずです。これでも250行程度なので、まだ張り付ける気になります。
import cv2
from PIL import Image
import glob
import numpy as np
import tkinter as tk
import tkinter.filedialog
import threading

dirName = ""
dstName = ""
nowprocess = False

###############################
# 2枚の画像の類似性の高いところを合成
def bai_blnd(base, frame):
    gbase = cv2.cvtColor(base, cv2.COLOR_RGB2GRAY).astype(np.int16)
    gfrme = cv2.cvtColor(frame, cv2.COLOR_RGB2GRAY).astype(np.int16)

    dif = np.abs(gbase - gfrme) / 10
    dif = np.clip(dif, 0, 8)
    dif = np.stack([dif, dif, dif], 2)

    return (base * dif + frame * (8 - dif)) / 8


###############################
# 2枚の画像のマッチングポイントを探す
def get_matcher(img1, kp2, des2):

    kp1, des1 = get_key_point(img1)

    if len(kp1) == 0 or len(kp2) == 0:
        return None

    # Brute-Force Matcher生成
    bf = cv2.BFMatcher()
    matches = bf.knnMatch(des1, des2, k=2)

    # store all the good matches as per Lowe's ratio test.
    good = []
    for m, n in matches:
        if m.distance < 0.7 * n.distance:
            good.append(m)

    if len(good) == 0:
        return None

    target_position = []
    base_position = []
    # x,y座標の取得
    for g in good:
        target_position.append([kp1[g.queryIdx].pt[0], kp1[g.queryIdx].pt[1]])
        base_position.append([kp2[g.trainIdx].pt[0], kp2[g.trainIdx].pt[1]])

    apt1 = np.array(target_position)
    apt2 = np.array(base_position)

    return apt1, apt2


###############################
# AKAZEによるマッチングポイントの探索
def get_key_point(img):

    gray = cv2.cvtColor(img, cv2.COLOR_RGB2GRAY)
    sift = cv2.AKAZE_create()

    # find the keypoints and descriptors with AKAZE
    kp2, des2 = sift.detectAndCompute(gray, None)
    return kp2, des2


###########################################
## 領域毎にマッチングポイントを切り出す。
def trim_point(start, end, pt1, pt2):
    tmp = np.where((start[0] < pt1) & (pt1 < end[0]))
    indx = tmp[0][np.where(tmp[1] == 0)]
    ptx1 = pt1[indx]
    ptx2 = pt2[indx]

    tmp = np.where((start[1] < ptx1) & (ptx1 < end[1]))
    indx = tmp[0][np.where(tmp[1] == 1)]
    apt1 = ptx1[indx]
    apt2 = ptx2[indx]

    return apt1, apt2


####################################
## 部分的な領域からアフィン行列を求める
def get_affine_mtx_partial(sx, sy, width, height, pt1, pt2):
    ex = sx + width
    ey = sy + height
    apt1, apt2 = trim_point([sx, sy], [ex, ey], pt1, pt2)
    if len(apt1) < 8:
        apt1 = pt1
        apt2 = pt2

    return cv2.estimateAffinePartial2D(apt1, apt2)[0]


####################################
## 部分マッチング(img1の一部をaffine変換したうえで、img2とパターンマッチングして微調整)
def get_affine_img_partial(sx, sy, width, height, img1, img2, tform):
    ex = sx + width
    ey = sy + height

    ofst = 32
    tform[0, 2] -= (sx - ofst)
    tform[1, 2] -= (sy - ofst)

    resz = cv2.warpAffine(img1, tform, (width + 2 * ofst, height + 2 * ofst))
    template = img2[sy:ey, sx:ex, :]

    res = cv2.matchTemplate(resz, template, cv2.TM_SQDIFF)
    min_val, _, min_loc, _ = cv2.minMaxLoc(res)

    if min_val > 1000000:
        return template
    else:
        return resz[min_loc[1]:min_loc[1] + height, min_loc[0]:min_loc[0] + width, :]


####################################
## マッチング画像生成(img1をimg2にマッチさせるように変換)
def get_affine_img(img1, img2, apt1, apt2, ofst):
    height, width = img1.shape[:2]
    tmp = img2.copy()
    w = width // 4
    h = height // 4

    affinarray = []

    # 16分割してアフィン行列を求める
    for y in range(4):
        for x in range(4):
            sx = x * w + ofst[0]
            sy = y * h + ofst[1]

            tform = get_affine_mtx_partial(sx, sy, w, h, apt1, apt2)
            if tform is None:
                return img2

            affinarray.append(tform.reshape(6))

    # 32x32単位で画像の位置合わせをしていく
    w = (width-ofst[0]) // 32
    h = (height-ofst[1]) // 32
    affinarray = np.array(affinarray).reshape(4, 4, 6)
    affinarray = cv2.resize(affinarray, dsize=(w, h), interpolation=cv2.INTER_NEAREST)

    for y in range(h):
        for x in range(w):
            sx = x * 32 + ofst[0]
            sy = y * 32 + ofst[1]

            tmp[sy:sy + 32, sx:sx + 32, :] = get_affine_img_partial(sx, sy, 32, 32, img1, img2,
                                                                  affinarray[y][x].reshape(2, 3))

    return tmp


####################################
## 処理本体 スレッドで呼ばれることを考慮
def process():
    global dirName
    global nowprocess
    global dstName

    flist = glob.glob(dirName + "/*.jpg")  # ソースの写真群がある場所
    nowprocess = True

    lut = np.arange(0, 256)
    lut = 255 * ((lut / 255) ** 2.2)  # 逆ガンマ作成(浮動小数点)

    fname = flist.pop()
    print("base file:", fname)
    image = Image.open(fname)
    exif = image.info["exif"]  # exif情報取得

    base = np.array(image, dtype=np.uint8)
    sums = lut[base]

    kp2, des2 = get_key_point(base)
    cnt=1

    for fname in flist:
        print(fname)
        current = np.array(Image.open(fname), dtype=np.uint8)

        pt1, pt2 = get_matcher(current, kp2, des2)
        img1 = get_affine_img(current, base, pt1, pt2, [cnt + 0, cnt + 0])
        img2 = get_affine_img(current, base, pt1, pt2, [cnt + 16, cnt + 16])  # 位相をずらして2回目
        cnt+=2

        sums += lut[bai_blnd(base, img1).astype(np.uint8)]
        sums += lut[bai_blnd(base, img2).astype(np.uint8)]

    out = (sums / cnt)  # 平均化
    out = (255 * ((out / 255) ** (1 / 2.2))).astype(np.uint8)

    Image.fromarray(out).save(dstName, "JPEG", exif=exif, quality=95)

    button2["text"] = "実行"
    nowprocess = False


####################################
## フォルダ選択ボタン
def button1_clicked():
    if nowprocess:
        return

    global dirName
    dirName = tk.filedialog.askdirectory()


####################################
## 実行ボタン
def button2_clicked():
    if nowprocess:
        return

    global dstName
    dstName = tk.filedialog.asksaveasfilename(filetypes=[("JPEG file", ".jpg")])
    if dstName != "":
        button2["text"] = "実行中..."
        thread = threading.Thread(target=process)
        thread.start()


####################################
## main
if __name__ == '__main__':
    root = tk.Tk()
    root.geometry('200x100')

    button1 = tk.Button(text="選択", command=button1_clicked, width=20)
    button1.place(x=30, y=20)
    button2 = tk.Button(text="実行", command=button2_clicked, width=20)
    button2.place(x=30, y=60)

    root.mainloop()


コメント